Thats too much for a writting tutorial. This is just the basic setup, to push people in the right direction@TrinityDEV , you might wanna add something about Listeners just the normal PlayerJoinEvent
Minecraft PC IP: play.cubecraft.net


Damn this forum is dead


Congratulations on bedrock helper!

You are using an out of date browser. It may not display this or other websites correctly.
You should upgrade or use an alternative browser.
You should upgrade or use an alternative browser.
We all started at this point. People can learn the basic stuff from this, to get in it. If they really wanna improve they should learn more and more. But we all (plugin devs) started here, with basic stuff and everything in one class.With regards to the tutorial itself, I'd say even for basic plugin development these days, looking into Gradle or Maven is a must. With IDEs, I'd go for IntelliJ over Eclipse, the autocomplete is better, live templates enhance productivity so much, and maven/git support is built in (as opposed to using a plugin).
I'd say it would also be better to know OOP concepts before moving into plugin development, and doing things like creating classes for each CommandExecutor rather than having them all in the main class can end up in far cleaner code in larger projects.
Please don't reply to threads this old (older than 2 weeks old)To bad i already knew everything, but very well explained!
My bad, didn't look at that.Please don't reply to threads this old (older than 2 weeks old)
Damn this forum is dead

I understand that this is a REALLY BASIC turtorial but I dont understand any of this thread.....
Agreed, IntelliJ is so much better than eclipseI wouldn't suggest using Eclipse being that it doesn't provide resources which are needed. IntelliJ or Netbeans is a great alternative
Poor Eclipse :VAgreed, IntelliJ is so much better than eclipse
Noobs don't understand IntelliJI wouldn't suggest using Eclipse being that it doesn't provide resources which are needed. IntelliJ or Netbeans is a great alternative
What? A noob wouldnt understand neither eclipse nor intellij. Someone new to java would have to learn an IDE, and IntelliJ is a much better choice. If anything is harder, it would be Eclipse because of its lack of essential features.Noobs don't understand IntelliJ
I'm going to casually pretend like I understand 1% of anything they're talking about ;-;What? A noob wouldnt understand neither eclipse nor intellij. Someone new to java would have to learn an IDE, and IntelliJ is a much better choice. If anything is harder, it would be Eclipse because of its lack of essential features.
lmao, I'm going to try IntelliJ. I was using Eclipse, until this post :PWhat? A noob wouldnt understand neither eclipse nor intellij. Someone new to java would have to learn an IDE, and IntelliJ is a much better choice. If anything is harder, it would be Eclipse because of its lack of essential features.
What for Tutorial is this? An can you make a tutorial for World edit 1.9 And That Forge for ''Mod'' Map?IMPORTANT: This tutorial is quite a long tutorial, so if you are not really interested in coding i would not recommend you to read any further. Also if you are an experienced developer dont hate its noobish coded, its coded the easy way so new coders will understand it. Thanks for understanding.
Hey all.
So in this thread I'll try to learn you something about coding a basic plugin for bukkit/spigot. Why I post this here? Hmm, good questions, I was just surfing around the forums and thought, why not. Its also my first tutorial, so I appreciate feedback.
(Yes I use eclipse, because I just like it more then IntelliJ, and if you're wondering, the black theme is called MoonRise UI, with font called something like RainbowDrops)
I'll not create a whole minigame here, or something like that, I just look into the basics of coding. You don't understand what i'm doing? I suggest you to learn basic java first, not needed if you stay with basic plugins, but if you want to make more advanced plugins its much better to know what you need to do. Or you can just comment and I will help you :)
QUICK NOTE: English is not my main language so sorry if the grammar is badly typed, if you dont understand it, contact me and i will try to explain it better. If you are wondering, I am from The Netherlands (Europe)
Lets get started :)
1) Downloading Program
You need a coding platform to create plugins for your server, in this tutorial I'll be using the program called "eclipse", it can be downloaded here in order to use eclipse you need to have Java JDK installed. You dont know how to do this? Well luckily for you, there is a tutorial about how to install it, that one can be found here
2) Creating your project
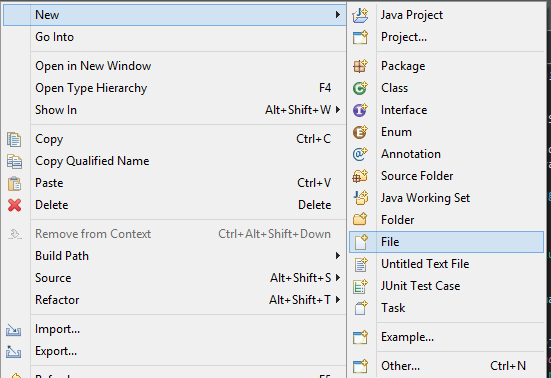
Now that you have launced eclipse you can see at the left a box called "Package Explorer", right click inside that box, now you will see something like this:
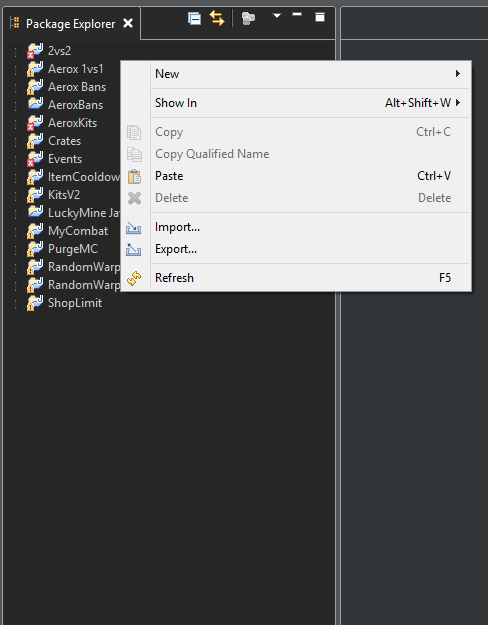
(Ignore all the existing projects)
Hover over New, and click Java Project. After you clicked that, you see a popup screen with a lot of text, its not needed to change anything in there, unless you want to change the Java version, or the workspace (where projects will save files to, and load files from)
In the box at the top you can type the name of the plugin, for example "First Plugin", after that it will look something like this:
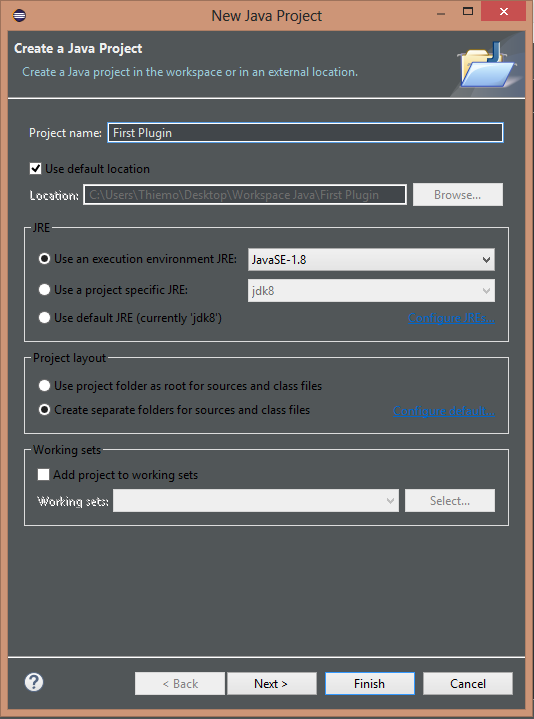
Now click finish. It will take a few seconds to create your project. When its done your project will be displayed at the left (inside the package explorer. Click on the little arrow at the left of your project name, or double click it. You wil now see a map with the name "src", right click on that map, then click New > Package. A little screen will pop up now. Dont change the source folder, only type in the name of your package. Wait, not so quick, before we continue i will explain what a package is. A package is simply an sort of folder to keep your files into. We use packages to organize the classes, because in Java (almost) every time you got a lot of classes. And its a mess to keep it in one folder, so thats why we store it in packages.
For example i got a plugin, that will teleport you to spawn on join, and a command to set the spawn. What i would do is create main package, (example name: eu.trinitydev.spawnplugin), and inside there i create a class called "Core", now i need (not really just example) 2 Classes for the commands, and 3 to handle the teleport on join. So i make 2 packages (eu.trinitydev.spawnplugin.commands and eu.trinitydev.spawnplugin.events), if you dont understand this its not that bad, you will not need this to learn to code. Interested in packages? Go check out this tutorial
Lets continue on the plugin. So i name my package eu.trinitydev.firstplugin. The name does not really matter, most most times you use your domain, (because of copyright conflicts etc). If you dont have a domain you can just use me.yourname.pluginname, please dont use captial letters in your package name. After you typed in your package name you will got something like this:
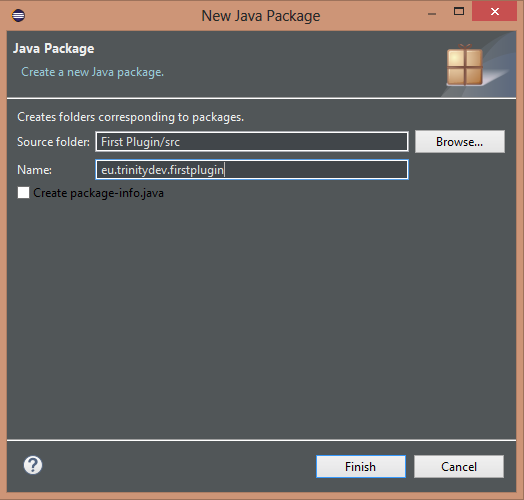
Now click finish.
You will now see your package in the source folder at the left (package explorer). The small icon will look something white toast.
Right click on your package, Click New > Class. A little box will open (again) Dont change package name etc, only type in a class name.
It doesnt matter what you name it but it needs to start with a captial letter. Most times i name my main classes: "Core, Main or PluginName" For now i will call it Main. Click finish. The "white toast" icon will now color brown. That means its not empty anymore. Inside your package you will find your class, open it (if its not opened automatically). You thought you were done now? Nope, sadly we are not.
We will ned to add an "external jar" to our project. In this case i will use the Spigot API. We need to do this to acces the core code of plugins. You add an external jar by right clicking your project, Buildpath > Configure buildpath. A box wil open up.. Yes again another box. You will see a button at the left called "Add external jars" click it, and look for you spigot/bukkit jar.
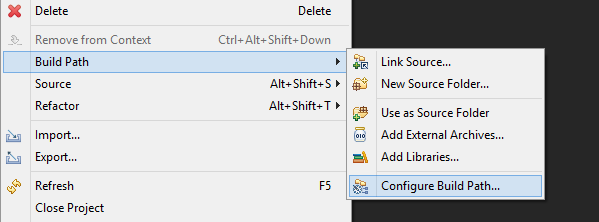
If you dont have it you can download it easy, just google "bukkit jar download" or "spigot jar download"
After you selected your spigot/bukkit jar, press OK.
Now you are done with setting up the project, and we can finally continue to the code
3) Loading up the plugin
Open up your main class, that we created in the previous step
You will see an almost empty file that will look something like this:
Code:package yourpackage.firstplugin; public class ClassName { }
Change the line with
toCode:public class ClassName {
Ofcourse replace ClassName with the name of your class. Dont forget to import JavaPlugin, hover over it, or press ctrl + shift + oCode:public class ClassName extends JavaPlugin {
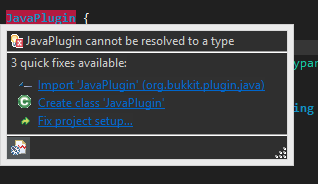
Well done, you just completed the first step. Wondering what "extends JavaPlugin" does? Very good, you are interested, nice. Let me explain it. Its simply basic code for the plugin. Servers (mostly) run using Bukkit or Spigot, and thats what we added to our buildpath. If we let this class extend JavaPlugin we basically scream to Bukkit or Spigot. "HEY, my main class is here, read this when starting up this plugin", so yeah, thats pretty much it.
A main class always needs an method called "onEnable", what this does is basically loading up the plugin, you can add variables in here or for example loading files and stuff (more advanced coding) We just start with a basic message to log the console the plugin has been enabled.
Create a onEnable method like this:
Not hard isnt it?Code:public void onEnable() { }
Now we add a line to message the console
getLogger() is simply the plugin logging stuff, you could use System.out.printIn("message"), but thats just a empty message without time etc.Code:public void onEnable() { getLogger().info("---> My First plugin is now launced, partyparty yeah. <---"); }
Your code will now look something like this:
Ofcourse again, class name and packages names will not match with yours.Code:package eu.trinitydev.firstplugin; import org.bukkit.plugin.java.JavaPlugin; public class Main extends JavaPlugin { public void onEnable() { getLogger().info("---> My First plugin is now launced, partyparty yeah. <---"); } }
Now we are done with the basic loading up stuff. And we now continue to our first command! Yeah!
4) Creating a command
Spigot/Bukkit uses a simple method/boolean called "onCommand" to run commands. The onCommand method looks like this:
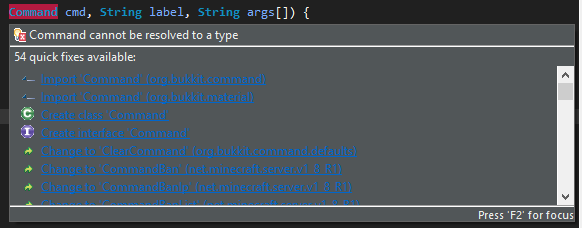
Because its a boolean you will need a return statement at the end of the boolean. Dont understand it? Go look inside basic java tutorialsCode:public boolean onCommand(CommandSender sender, Command cmd, String label, String args[]) { return false; }[/COLOR]
Inside this boolean we can get the sender of the command, the command names, or command label, and the arguments. Lets start by checking if the sender (CommandSender that we assigned to variable sender in our boolean) is an player or a console. Oh, quick note again, if you got errors underlined CommandSender, and command, hover over it and import it, or just use ctrl + shift + o.
Lets continue onto the code. First of all we check what type of command the player typed.
What this means if a player or console typed /test. We assigned the value cmd to Command in our method.Code:if(cmd.getName().equals("test") { //code here, oh and yeah quick note, comments in code start with double slashes like this /** or like this **/ }
And if we want to check if sender is an player or not. Its pretty simple, inside our command boolean we just do this
No worries, i will explain what it does, as you can see in the line "if(!(sender instanceof Player))" there is a "!". That means its negative, so when player is not an player. instanceof means is equal to.Code:if(!(sender instanceof Player)) { } else { } [/COLOR]
Example:
Code:if(!(sender instanceof Player)) { //this means if sender is not equal to a player } if(sender instanceof Player) { //this means if sender is equal to a player }
So what we can do for example:
Dont forget to import ChatColor ;)Code:public boolean onCommand(CommandSender sender, Command cmd, String label, String args[]) { if(cmd.getName().equals("test") { if (!(sender instanceof Player)) { sender.sendMessage(ChatColor.BLUE + "Hey, you are a console, i see it with my code"); } else { sender.sendMessage(ChatColor.GREEN + "Hey, you are a player, i see it with my code"); } } return false; }
What we did now if easy, when someone types /test it checks if its a player or the console, and them send them a message. Coding isnt that hard, isnt it?
Our final result of the command:
Code:public boolean onCommand(CommandSender sender, Command cmd, String label, String args[]) { if(cmd.equals("test")) { if (!(sender instanceof Player)) { sender.sendMessage(ChatColor.BLUE + "Hey, you are a console, i see it with my code"); } else { sender.sendMessage(ChatColor.GREEN + "Hey, you are a player, i see it with my code"); } } return false; }
And our whole class:
Code:package eu.trinitydev.firstplugin; import org.bukkit.ChatColor; import org.bukkit.command.CommandSender; import org.bukkit.entity.Player; import org.bukkit.material.Command; import org.bukkit.plugin.java.JavaPlugin; public class Main extends JavaPlugin { public void onEnable() { getLogger().info( "---> My First plugin is now launced, partyparty yeah. <---"); } public boolean onCommand(CommandSender sender, Command cmd, String label, String args[]) { if(cmd.equals("test")) { if (!(sender instanceof Player)) { sender.sendMessage(ChatColor.BLUE + "Hey, you are a console, i see it with my code"); } else { sender.sendMessage(ChatColor.GREEN + "Hey, you are a player, i see it with my code"); } } return false; } }
Pfew, we are almost done with our plugin, what we need to do now is adding a plugin.yml file, in this file we can set the plugin name, version, author, commands, permissions etc.
Right click on your plugin project. New > File. And name the file: plugin.yml
Press finish. Now the file will be created and openend. In my case it opens wordpad because ive set wordpad for .yml files.
Inside there type this:
And again, you change it to what you want and need. Save the file and close editor (if you use it)Code:name: PluginName version: 1.0 author: YourName commands: test: description: What ever you want
Now right click on your project. And click export now look for Java, open it and click Jar file
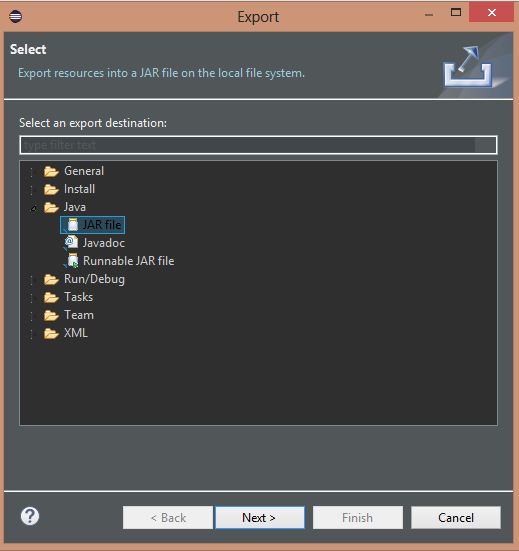
Click next, select your destination, and click finish.
You are done now :) Great news right? You finished the huge tutorial, good job, im proud.
Got any questions left, or you want to learn more, comment it :)
Any feedback is appricated, and again sorry for my english
Greetings!
:: TrinityDEV - Thiemo
Similar threads
- Replies
- 1
- Views
- 518
- Poll
- Replies
- 0
- Views
- 118
Members online
Total: 1,682 (members: 8, guests: 1,674)
Latest profile posts
Congratulations on bedrock helper!

Thanks for the follow!