



Welcome to the CubeCraft Skyblock Guides Hub!
Whether you're a brand new islander or a returning veteran your next milestone, this is your one-stop Guide Hub for everything about Skyblock. From Coins and Augments to Dungeons and Crafting Recipes, every guide you need to progress faster and play smarter lives right here.
Below you'll find a full overview of every guide available, then under the table of contents you can find every guide available.
✦ ─────────── ⋆ ─────────── ✦
Table of Contents
Augments
Skyblock Coins
Useful Farms & Links
Commands
Common Issues
Crafting Recipes
Discoverables
Dungeons
Dye Crafting & Locations
Enchantments
Experience
Island Management
Island Information
Mechanics
Player Traits
Quest List
Shrine Locations
Warper Locations
Skyblock Coins
Useful Farms & Links
Commands
Common Issues
Crafting Recipes
Discoverables
Dungeons
Dye Crafting & Locations
Enchantments
Experience
Island Management
Island Information
Mechanics
Player Traits
Quest List
Shrine Locations
Warper Locations
Guides
──────── ⋆⋅☆⋅⋆ ────────
Augments
Augments are permanent power-ups that can be applied to tools and armour. Unlike regular enchantments, they are a separate system that provides additional passive or triggered effects. There are currently 85 different augments in the game, each with its own rarity, with some being considerably more valuable and desirable than others. Augments are obtained by using Runes, which can be obtained from Dungeons. Once a tool or piece of armor reaches Level 3, 8, or 20, a Rune can be applied to it at the Forge, unlocking an augment slot. Each item can have a maximum of 3 augments, with one slot unlocked at each of these levels. The augment you receive is completely random, meaning you cannot choose which augment is applied to your item.
Cubecraft Skyblock Augments List
Cubecraft Skyblock Augments List This is a list of all the currently known augments from the recent Skyblock Reborn update compiled by members of the community.
Skyblock Coins
Skyblock Coins are the backbone of progression on CubeCraft Skyblock. Whether you're expanding your island, gearing up to face tricky Dungeons, or completing quests, nearly every major milestone comes down to one thing: how much money you have, and whether it’s enough.
Grinding money isn't just about farming nonstop it's about knowing where to invest your coins and which builds to avoid entirely. One bad investment can wipe out billions of coins and cost you hundreds of hours of wasted efficiency.
This guide breaks down the best farms to build at each stage of the game to maximize your earnings and step-by-step instructions for setting each one up.
Upon starting your adventure in CubeCraft Skyblock, coins aren’t actually necessary for quite a while. If you earn any money from quest rewards early on, hold onto it! You will need those coins later to upgrade a Chicken Spawner once on Snowy Taiga Island and upgrade Spider Spawners four times on Jungle Island.
If you ever run out of money during this early stretch, build a simple Cow Farm. A basic dropper setup works perfectly here since it's just the start of the game.
──────── ⋆⋅☆⋅⋆ ────────
Tutorial Schematic

 www.shulkr.com
──────── ⋆⋅☆⋅⋆ ────────
If you ever run out of money during this early stretch, build a simple Cow Farm. A basic dropper setup works perfectly here since it's just the start of the game.
──────── ⋆⋅☆⋅⋆ ────────
Tutorial Schematic
Cow Farm - Phase 1 | Starting Skyblock - Minecraft Schematic - Shulkr
A tiny 4x4 vertical fall farm that exploits the fact that cows spawn directly on top of a button, then fall straight down to their death, letting you passively collect leather and raw beef to sell for early game coins. 4×29×4, 391 blocks. Free Minecraft schematic download with a 3D preview on...
www.shulkr.com
──────── ⋆⋅☆⋅⋆ ────────
This is where your coin requirements start to kick in. You will encounter a notoriously tricky quest called "Blot Out The Sun", which requires you to craft 500 arrows.
To complete this efficiently, you should build a large, multi-layered Cocoa Bean farm equipped with a top-down water flushing system for fast harvesting. Harvest your cocoa beans, sell them for coins, and use those profits to buy gravel. Process the gravel for flint until you have enough to craft the 500 arrows.
──────── ⋆⋅☆⋅⋆ ────────
Tutorial Video
──────── ⋆⋅☆⋅⋆ ────────
Tutorial Schematic
 www.shulkr.com
──────── ⋆⋅☆⋅⋆ ────────
To complete this efficiently, you should build a large, multi-layered Cocoa Bean farm equipped with a top-down water flushing system for fast harvesting. Harvest your cocoa beans, sell them for coins, and use those profits to buy gravel. Process the gravel for flint until you have enough to craft the 500 arrows.
──────── ⋆⋅☆⋅⋆ ────────
Tutorial Video
──────── ⋆⋅☆⋅⋆ ────────
Tutorial Schematic
Cocoa Bean Farm - Phase 2 | Getting Stuck Into It - Minecraft Schematic - Shulkr
Multi-tier jungle log Cocoa Bean farm for early Skyblock progression, giving you a steady, stackable income source at the Desert Island before the Birch Island. 25×29×19, 1,810 blocks. Free Minecraft schematic download with a 3D preview on Shulkr.
www.shulkr.com
──────── ⋆⋅☆⋅⋆ ────────
Once you unlock Birch Island, cocoa beans become obsolete. Melons are now your primary source of income.
Farm Setup: Your melon farm can be whatever size you like the larger the footprint, the more money you'll generate.
Equipment: Mine them using a Copper Axe - Also can eat Chocolate to gain Speed and Haste while harvesting.
Recommended Enchantments: Silk Touch I + Efficiency IV (or Silk Touch I + Efficiency III + Unbreaking I)
Note: You will need to repair your axe periodically, but that is completely normal. Fortune on the axe is pointless here with a giant farm, block breaking speed and efficiency matter far more than extra drops.
──────── ⋆⋅☆⋅⋆ ────────
Tutorial Schematic
 www.shulkr.com
──────── ⋆⋅☆⋅⋆ ────────
Farm Setup: Your melon farm can be whatever size you like the larger the footprint, the more money you'll generate.
Equipment: Mine them using a Copper Axe - Also can eat Chocolate to gain Speed and Haste while harvesting.
Recommended Enchantments: Silk Touch I + Efficiency IV (or Silk Touch I + Efficiency III + Unbreaking I)
Note: You will need to repair your axe periodically, but that is completely normal. Fortune on the axe is pointless here with a giant farm, block breaking speed and efficiency matter far more than extra drops.
──────── ⋆⋅☆⋅⋆ ────────
Tutorial Schematic
Melon Farm - Phase 3 | Nearing Mid Game - Minecraft Schematic - Shulkr
No-Water Melon Farm scalable income build for the Birch Island that replaces cocoa beans as your main money maker. 40×3×81, 8,100 blocks. Free Minecraft schematic download with a 3D preview on Shulkr.
www.shulkr.com
──────── ⋆⋅☆⋅⋆ ────────
Welcome to the Savannah Island, the crucial bridge between early-game grinding and the endgame economy. Your main priority here is building a Pig Farm. This will generate millions of coins per hour, yielding roughly 10x the income of anything available on previous islands.
──────── ⋆⋅☆⋅⋆ ────────
Fence Gate Design
You have two footprint layouts to choose from: 10x10 or 6x4.
Pros: Compact, narrow footprint with high vertical spawner density.
Cons: Extremely tedious to manually place and open every fence gate.
Tutorial Video
Tutorial Schematic (6x4)
 www.shulkr.com
Tutorial Schematic (10x10)
(Gains slightly more than the 6x4 but takes more effort & time to build)
 www.shulkr.com
──────── ⋆⋅☆⋅⋆ ────────
www.shulkr.com
──────── ⋆⋅☆⋅⋆ ────────
──────── ⋆⋅☆⋅⋆ ────────
Fence Gate Design
You have two footprint layouts to choose from: 10x10 or 6x4.
Pros: Compact, narrow footprint with high vertical spawner density.
Cons: Extremely tedious to manually place and open every fence gate.
Tutorial Video
Tutorial Schematic (6x4)
Pig Farm (Gates Based, 6x4) - Phase 4 | Grindy Mid-Game - Minecraft Schematic - Shulkr
A gate-based 6x4 hole pig farm reaching 97.7% efficiency at 166 million coins per hour with 864 spawners, one of the highest output layouts available. 8×82×9, 3,430 blocks. Free Minecraft schematic download with a 3D preview on Shulkr.
www.shulkr.com
Tutorial Schematic (10x10)
(Gains slightly more than the 6x4 but takes more effort & time to build)
Pig Farm (Gates Based, 10x10) - Phase 4 | Grindy Mid-Game - Minecraft Schematic - Shulkr
An updated 10x10 nether-compatible pig farm hitting 170 million coins/hour with 868 spawners, refined for mob cap efficiency and zero glitching. 12×90×12, 10,645 blocks. Free Minecraft schematic download with a 3D preview on Shulkr.
www.shulkr.com
The end is finally here... you’ve made it this far.
For the ultimate end-game coin farm, we use a Blaze Looting Farm. This setup can fill your entire inventory with Blaze Rods in just a few seconds, depending on how many spawners you place. Even a single Level 1 Blaze Spawner alone can generate roughly 6 Million Coins per hour, scaling up to a massive 4 to 6 Billion Coins per hour when fully maxed out!
In this design, mobs spawn inside bubble columns, launch upward, and are pushed into the center by water streams. This setup lets you hit them directly through a chest, as drops pass right through it since chests aren't full blocks.
Requirements
A weapon with the Multi-Hit Augment and a high level of Looting (preferably max level: 20)
(For the Multi-Hit Augment, can farm the Cobblemine level 3 Dungeon or Snowy Ravine level 3)
Showcase
Tutorial Video
Tutorial Schematic
 www.shulkr.com
For the ultimate end-game coin farm, we use a Blaze Looting Farm. This setup can fill your entire inventory with Blaze Rods in just a few seconds, depending on how many spawners you place. Even a single Level 1 Blaze Spawner alone can generate roughly 6 Million Coins per hour, scaling up to a massive 4 to 6 Billion Coins per hour when fully maxed out!
In this design, mobs spawn inside bubble columns, launch upward, and are pushed into the center by water streams. This setup lets you hit them directly through a chest, as drops pass right through it since chests aren't full blocks.
Requirements
A weapon with the Multi-Hit Augment and a high level of Looting (preferably max level: 20)
(For the Multi-Hit Augment, can farm the Cobblemine level 3 Dungeon or Snowy Ravine level 3)
Showcase
Tutorial Video
Tutorial Schematic
Coins and Experience Farm - Phase 5 | End-Game - Minecraft Schematic - Shulkr
A compact vertical mob farm that uses bubble columns to lift spawned mobs into a central kill chamber, letting you finish them off by hand with a Looting sword for massively boosted item drops. 13×29×13, 4,537 blocks. Free Minecraft schematic download with a 3D preview on Shulkr.
www.shulkr.com
──────── ⋆⋅☆⋅⋆ ────────
Wood
Chickens
Cactus
Any Pig Farm design not listed in Phase 4
Creeper Farm
Sugar
Slime
Magma Cube
Sheep
──────── ⋆⋅☆⋅⋆ ────────
Wood
Chickens
Cactus
Any Pig Farm design not listed in Phase 4
Creeper Farm
Sugar
Slime
Magma Cube
Sheep
──────── ⋆⋅☆⋅⋆ ────────
Useful Farms & Links
Farms
Tutorial Video
Tutorial Schematic
 www.shulkr.com
Tutorial Schematic
Fish Farm | AFK [Java Only] - Minecraft Schematic - Shulkr
Fully AFK Fish Farm. 1×3×5, 11 blocks. Free Minecraft schematic download with a 3D preview on Shulkr.
www.shulkr.com
Tutorial Schematic
(When mining the Glowstone, ensure you're using a fortune tool & have your lumber trait up as high as you can get it)
(In this setup, you mine the trees from top to bottom for good fast efficiency)
 www.shulkr.com
(When mining the Glowstone, ensure you're using a fortune tool & have your lumber trait up as high as you can get it)
(In this setup, you mine the trees from top to bottom for good fast efficiency)
Optimal Glowstone Tree Setup - Minecraft Schematic - Shulkr
Most Efficient Glowstone Tree Farm. 65×34×66, 9,147 blocks. Free Minecraft schematic download with a 3D preview on Shulkr.
www.shulkr.com
Tutorial Schematic
 www.shulkr.com
Spider Farm | AFK - Minecraft Schematic - Shulkr
Fully Automatic AFK Spider Farm. 13×7×13, 919 blocks. Free Minecraft schematic download with a 3D preview on Shulkr.
www.shulkr.com
Tutorial Schematic
 www.shulkr.com
Spider Farm | Manual - Minecraft Schematic - Shulkr
Compact Manual Spider Farm — Spider Eyes Made Easy. 13×4×12, 550 blocks. Free Minecraft schematic download with a 3D preview on Shulkr.
www.shulkr.com
Showcase
Tutorial Schematic
 www.shulkr.com
Tutorial Schematic
Wither Trap - Minecraft Schematic - Shulkr
Simple cobblestone containment box for safely summoning and fighting the Wither, no fancy materials required. 11×8×9, 453 blocks. Free Minecraft schematic download with a 3D preview on Shulkr.
www.shulkr.com

CubeCraft SkyBlock Fall Heights
An introduction to Skyblock, the complete quest list, and every Warper, Dungeon and Shrine location with an Augment list.
Skyblock Notion
Skyblock Notion
It is recommended that you enable an ad blocker while browsing the Wiki for a cleaner and more enjoyable experience.
CubeCraft Skyblock Wiki
CubeCraft Skyblock Wiki
Throughout this guide, you'll find a wide range of schematics for various builds, such as Skyblock Coin farms and Experience farms upon many more. Unfortunately, this is a Java only mod, hopefully it makes its way to Bedrock in the future.
On CubeCraft, you're allowed to use this modification under certain circumstances: you can use it to guide you while building, but you're not allowed to use the auto-build feature. Below is a video covering how to install the mod, as well as how to use it. Download it from Fabric, and make sure the mod version matches your Minecraft version. Below is a video covering how to install the mod, as well as how to use it.
How To Download and Install Litematica
How To Use Litematica
On CubeCraft, you're allowed to use this modification under certain circumstances: you can use it to guide you while building, but you're not allowed to use the auto-build feature. Below is a video covering how to install the mod, as well as how to use it. Download it from Fabric, and make sure the mod version matches your Minecraft version. Below is a video covering how to install the mod, as well as how to use it.
How To Download and Install Litematica
How To Use Litematica
Commands
There are actually quite a few commands that can be used directly in the Skyblock chat. Most of them aren't advertised or explained in-game, so they can be surprisingly easy to miss. Below is a list of the commands currently available, along with what each one does.
Can use "/s", "/sb" or "/skyblock to execute these commands.
/skyblock discoverables - Open the Skyblock discoverables menu.
/skyblock hub - Return to the Skyblock Hub.
/skyblock levels - Open the Skyblock levels menu.
/skyblock menu - Open the Skyblock hotbar menu.
/skyblock nether - Go to the nether dimension.
/skyblock overworld - Go to the overworld dimension.
/skyblock profiles - Skyblock profile management command.
/skyblock quests - Open the Skyblock quest menu.
/skyblock settings - Open the Skyblock settings menu.
/skyblock traits - Open the Skyblock traits menu.
/skyblock discoverables - Open the Skyblock discoverables menu.
/skyblock hub - Return to the Skyblock Hub.
/skyblock levels - Open the Skyblock levels menu.
/skyblock menu - Open the Skyblock hotbar menu.
/skyblock nether - Go to the nether dimension.
/skyblock overworld - Go to the overworld dimension.
/skyblock profiles - Skyblock profile management command.
/skyblock quests - Open the Skyblock quest menu.
/skyblock settings - Open the Skyblock settings menu.
/skyblock traits - Open the Skyblock traits menu.
/vanity ui profile - To see your statistics.
/ping - Check on your connection to the server.
/ping - Check on your connection to the server.
Common Issues
Problem: My shield is too big on screen.
Solution: There is currently no permanent fix while the developers work on a resolution.
Workaround (PC/Mobile): Make your shield transparent in settings as a temporary fix.
Workaround (Console): Go to Video Settings and enable "Hide Hand".
Solution: There is currently no permanent fix while the developers work on a resolution.
Workaround (PC/Mobile): Make your shield transparent in settings as a temporary fix.
Workaround (Console): Go to Video Settings and enable "Hide Hand".
Problem: I'm stuck in the void or a hole in the hub.
Solution: Open the Skyblock menu and click the Return to Spawn button.
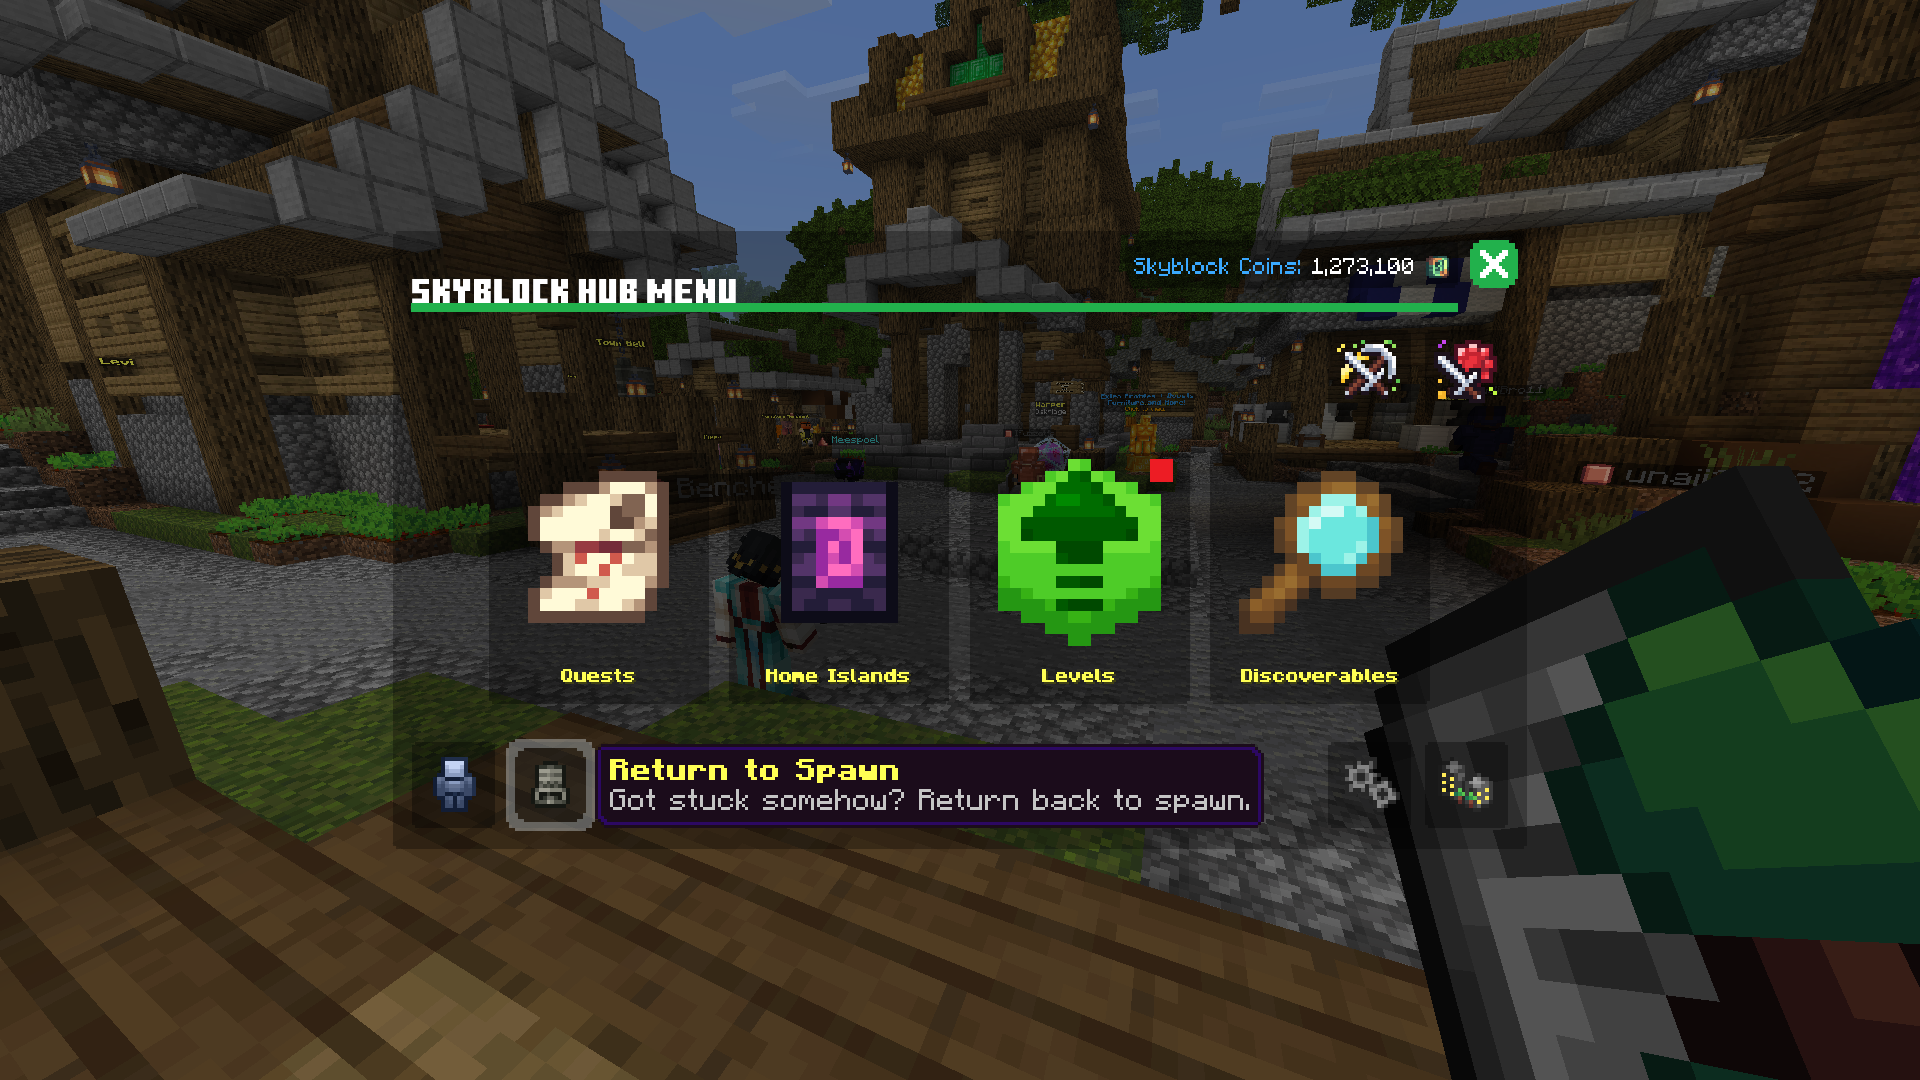
Solution: Open the Skyblock menu and click the Return to Spawn button.
Problem: I don't have shears to carve a pumpkin needed to defeat the Snow Golem boss.
Solution: Purchase a Carved Pumpkin directly from the Blocks Merchant in the Skyblock Hub.
Solution: Purchase a Carved Pumpkin directly from the Blocks Merchant in the Skyblock Hub.
Problem: My crops won't plant or grow because there isn't enough light.
Solution: Place torches, lanterns, glowstone, or other light sources near your crops to increase the light level and allow them to be planted and grow.
Solution: Place torches, lanterns, glowstone, or other light sources near your crops to increase the light level and allow them to be planted and grow.
Problem: My Skyblock UI is bugged and keeps reverting to the default chest UI instead of the custom Skyblock menu (as shown in the image below).
Solution: Clear CubeCraft's cached data packs by navigating to Main Menu > Settings > Storage and deleting all CubeCraft resource packs.
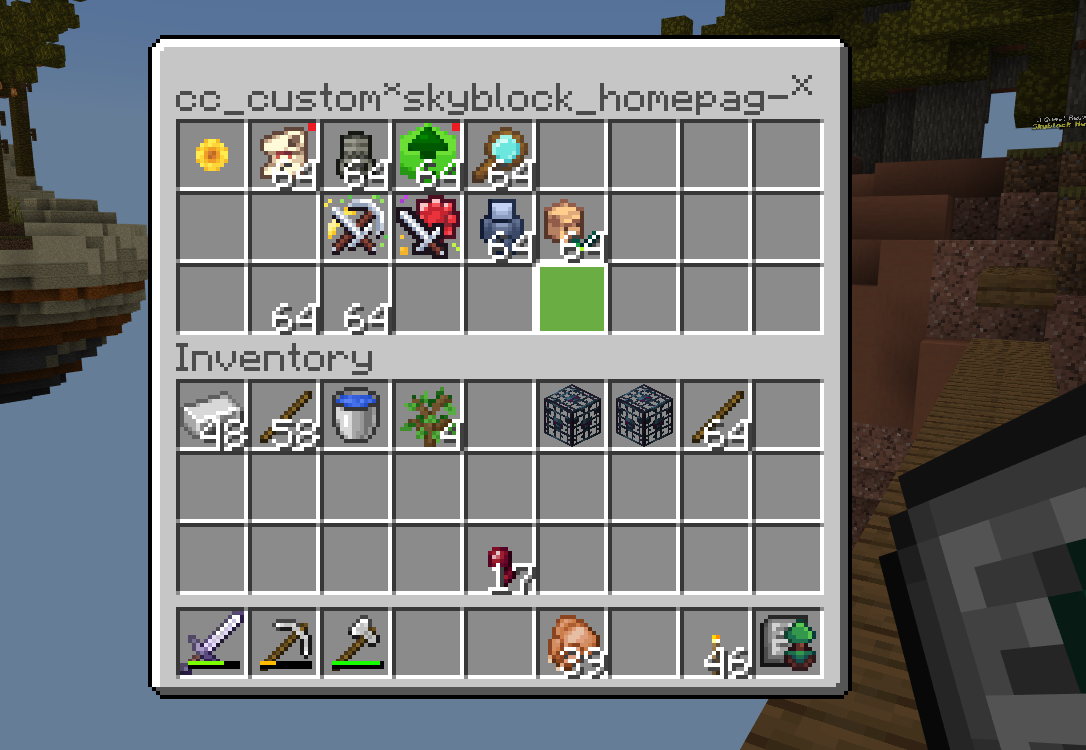
Solution: Clear CubeCraft's cached data packs by navigating to Main Menu > Settings > Storage and deleting all CubeCraft resource packs.
Crafting Recipes
Auto Harvesters
Common Auto Harvester - Not craftable, you must find these in Dungeons.
Uncommon Auto Harvester - 8 common auto harvesters with a block of coal in the middle.
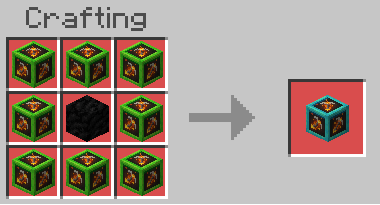
Rare Auto Harvester - 8 uncommon auto harvesters with a block of iron in the middle
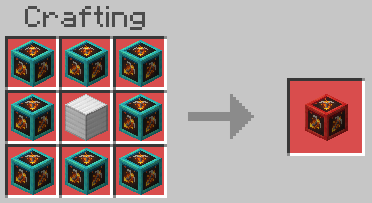
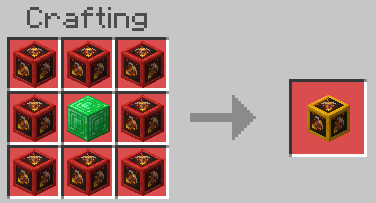
Legendary Auto Harvester - 8 rare auto harvesters with a block of emerald in the middle
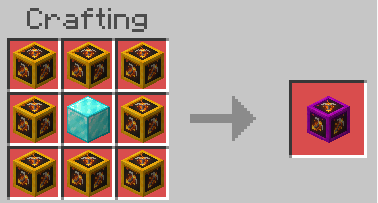
Mythical Auto Harvester - 8 legendary auto harvesters with a block of diamond in the middle
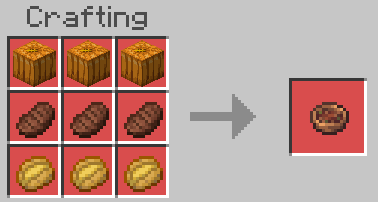
Place 3 pumpkins in the top row, 3 cooked steak in the middle row, and 3 baked potatoes in the bottom row. Complete this quest to unlock the Beef Stew crafting recipe.
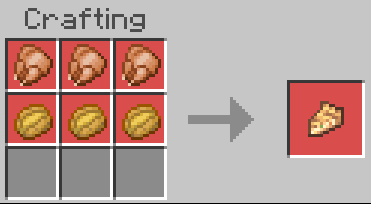
Place 3 cooked chickens in the top row and baked potatoes in the middle to craft the Chicken and Potato Pie.
Place 3 wheat in the top row, 1 egg in the middle-left slot, and fill the remaining slots with snowberries.
You'll need to complete this quest to unlock this recipe, that quest becomes available after finishing this quest.
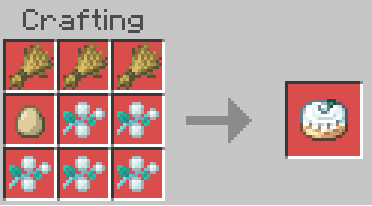
You'll need to complete this quest to unlock this recipe, that quest becomes available after finishing this quest.
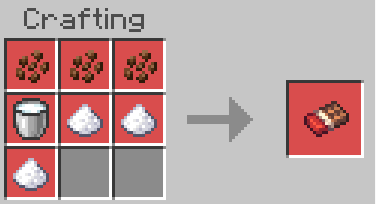
Place 3 cocoa beans across the top row, a milk bucket in the middle-left slot, sugar in the remaining two middle row slots, and sugar again in the bottom left slot. You'll need to complete this quest to unlock this recipe, that quest becomes available after finishing this quest.
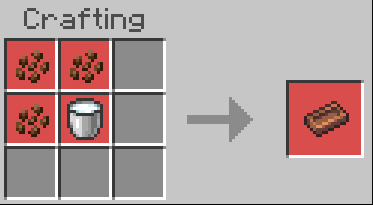
Place 2 cocoa beans in the top left and top middle slots, 1 cocoa bean in the middle-left slot, and a milk bucket in the centre. You'll need to complete this quest to unlock the recipe.
Discoverables Guide
Discoverables are hidden collectible items scattered across the Exploration Zone hubs. There are over 300 of them to find. They provide the perfect break if you don't feel like grinding dungeons or completing quests, while still providing a stat boost. Below you'll find video guides walking through each hub step by step. If you prefer working from coordinates rather than following a video, or just want to look up specific locations quickly, see the Discoverables Coordinate Guide for the complete list.
Dungeons
Dungeons are replayable combat challenges with dedicated loot, with six different dungeons to explore: Cobblestone Mine, Fallen Castle, Snowy Ravine, Lucien’s Lair, Duneside Escape, and Zombified Bastion. Each dungeon has three difficulty levels, with higher difficulties offering better loot.
Dungeons are intentionally challenging and aren’t designed to be cleared on your first day, so make sure your Traits are properly levelled up before taking them on.
Each Dungeon location by coordinates, to find your coordinates use "/wai" in the chat.
Overworld
Oak Forest Hub --> X: 34 Y:24 Z: 5,249
Plains Hub --> X: 2,000 Y: 72 Z: 5,037
Snowy Taiga Hub --> X: -47 Y: 74 Z: 6991
Jungle Hub --> X: 1 Y: 126 Z: 9,083
Desert Hub --> X: 54 Y: 15 Z: 11,033
Nether
Piglin Colony Hub --> X: -108 Y: 19 Z: 4,812
Overworld
Oak Forest Hub --> X: 34 Y:24 Z: 5,249
Plains Hub --> X: 2,000 Y: 72 Z: 5,037
Snowy Taiga Hub --> X: -47 Y: 74 Z: 6991
Jungle Hub --> X: 1 Y: 126 Z: 9,083
Desert Hub --> X: 54 Y: 15 Z: 11,033
Nether
Piglin Colony Hub --> X: -108 Y: 19 Z: 4,812
──────── ⋆⋅☆⋅⋆ ────────
Cobblestone Mine Dungeon
Armour: Protection III Leather Armour
Weapons: Bane of Arthropods V Stone Sword & Smite V Stone Sword.
(You can use a lower enchantment level if needed, and adding Unbreaking I can help your sword last longer)
──────── ⋆⋅☆⋅⋆ ────────
Fallen Castle Dungeon
Armour:
Weapons:
Guide for this Dungeon is coming soon.....
──────── ⋆⋅☆⋅⋆ ────────
Fallen Castle Dungeon
Armour:
Weapons:
Guide for this Dungeon is coming soon.....
──────── ⋆⋅☆⋅⋆ ────────
Snowy Ravine Dungeon
Armour:
Weapons:
Guide for this Dungeon is coming soon.....
──────── ⋆⋅☆⋅⋆ ────────
Lucien's Lair Dungeon
Armour:
Weapons:
Guide for this Dungeon is coming soon.....
──────── ⋆⋅☆⋅⋆ ────────
Duneside Escape Dungeon
Armour:
Weapons:
Guide for this Dungeon is coming soon.....
──────── ⋆⋅☆⋅⋆ ────────
Piglin Bastion
Armour: Protection V Copper Armour
Weapons: Smite VI Copper Sword.
(A lower Smite level can be used if needed, and adding Unbreaking I will help the sword last longer)
──────── ⋆⋅☆⋅⋆ ────────
Cobblestone Mine Dungeon
Armour: Protection III Leather Armour
Weapons: Bane of Arthropods V Stone Sword & Smite V Stone Sword.
(You can use a lower enchantment level if needed, and adding Unbreaking I can help your sword last longer)
──────── ⋆⋅☆⋅⋆ ────────
Fallen Castle Dungeon
Armour:
Weapons:
Guide for this Dungeon is coming soon.....
──────── ⋆⋅☆⋅⋆ ────────
Fallen Castle Dungeon
Armour:
Weapons:
Guide for this Dungeon is coming soon.....
──────── ⋆⋅☆⋅⋆ ────────
Snowy Ravine Dungeon
Armour:
Weapons:
Guide for this Dungeon is coming soon.....
──────── ⋆⋅☆⋅⋆ ────────
Lucien's Lair Dungeon
Armour:
Weapons:
Guide for this Dungeon is coming soon.....
──────── ⋆⋅☆⋅⋆ ────────
Duneside Escape Dungeon
Armour:
Weapons:
Guide for this Dungeon is coming soon.....
──────── ⋆⋅☆⋅⋆ ────────
Piglin Bastion
Armour: Protection V Copper Armour
Weapons: Smite VI Copper Sword.
(A lower Smite level can be used if needed, and adding Unbreaking I will help the sword last longer)
──────── ⋆⋅☆⋅⋆ ────────
Dye Crafting & Locations
Every dye in the game, sorted by the island you need to unlock or craft it.
Skyblock uses Java Edition crafting recipes, so if you're coming from Bedrock, some of these will look different than what you're used to.
──────── ⋆⋅☆⋅⋆ ────────
Oak Forest (#1)
Red Dye ➔ Place Beetroot in a crafting grid
──────── ⋆⋅☆⋅⋆ ────────
Cold Taiga (#3)
Blue Dye ➔ Use Lapis Lazuli
Purple Dye ➔ Craft Red Dye + Lapis Lazuli
──────── ⋆⋅☆⋅⋆ ────────
Jungle (#4)
Brown Dye ➔ Use Cocoa Beans
──────── ⋆⋅☆⋅⋆ ────────
Desert (#5)
Green Dye ➔ Smelt Cactus in a furnace
Cyan Dye ➔ Craft Green Dye + Lapis Lazuli
──────── ⋆⋅☆⋅⋆ ────────
Savannah (#7)
White Dye ➔ Use Bone Meal
Yellow Dye ➔ Apply Bone Meal to grass and harvest yellow flowers
Orange Dye ➔ Craft Red Dye + Yellow Dye
Lime Dye ➔ Craft Green Dye + Bone Meal
Light Blue Dye ➔ Craft Lapis Lazuli + Bone Meal
Pink Dye ➔ Craft Red Dye + Bone Meal
Magenta Dye ➔ Craft Pink Dye + Purple Dye
You can get Magenta and Yellow Dye way earlier by picking 2-block flowers with a flower picker
──────── ⋆⋅☆⋅⋆ ────────
Swampland (#9)
Black Dye ➔ Use Ink Sacs (Unlocked in the shop after completing the Swampland side quests)
Gray Dye ➔ Craft Ink Sac + Bone Meal
Light Gray Dye ➔ Craft Gray Dye + Bone Meal
──────── ⋆⋅☆⋅⋆ ────────
Oak Forest (#1)
Red Dye ➔ Place Beetroot in a crafting grid
──────── ⋆⋅☆⋅⋆ ────────
Cold Taiga (#3)
Blue Dye ➔ Use Lapis Lazuli
Purple Dye ➔ Craft Red Dye + Lapis Lazuli
──────── ⋆⋅☆⋅⋆ ────────
Jungle (#4)
Brown Dye ➔ Use Cocoa Beans
──────── ⋆⋅☆⋅⋆ ────────
Desert (#5)
Green Dye ➔ Smelt Cactus in a furnace
Cyan Dye ➔ Craft Green Dye + Lapis Lazuli
──────── ⋆⋅☆⋅⋆ ────────
Savannah (#7)
White Dye ➔ Use Bone Meal
Yellow Dye ➔ Apply Bone Meal to grass and harvest yellow flowers
Orange Dye ➔ Craft Red Dye + Yellow Dye
Lime Dye ➔ Craft Green Dye + Bone Meal
Light Blue Dye ➔ Craft Lapis Lazuli + Bone Meal
Pink Dye ➔ Craft Red Dye + Bone Meal
Magenta Dye ➔ Craft Pink Dye + Purple Dye
You can get Magenta and Yellow Dye way earlier by picking 2-block flowers with a flower picker
──────── ⋆⋅☆⋅⋆ ────────
Swampland (#9)
Black Dye ➔ Use Ink Sacs (Unlocked in the shop after completing the Swampland side quests)
Gray Dye ➔ Craft Ink Sac + Bone Meal
Light Gray Dye ➔ Craft Gray Dye + Bone Meal
──────── ⋆⋅☆⋅⋆ ────────
Enchantments
The experience costs and material requirements needed to enchant items across every tool tier.
──────── ⋆⋅☆⋅⋆ ────────
Experience Costs by Tool Tier
A breakdown of the XP required to upgrade your tools at each level.
• Wood Tier (Includes Flint & Steel, Fishing Rod)
↳ Levels 1–5: 3, 6, 9, 12, 15
↳ Levels 6–20: 70, 84, 98, 112, 126, 140, 154, 168, 182, 196, 210, 224, 238, 252, 266
↳ Scaling: +14 XP per level after Level 6
• Stone / Copper / Gold Tiers (All identical)
↳ Levels 1–5: 5, 10, 15, 20, 25
↳ Levels 6–20: 75, 90, 105, 120, 135, 150, 165, 180, 195, 210, 225, 240, 255, 270, 285
↳ Scaling: +15 XP per level after Level 6
• Iron Tier (Includes Shears, Shield, Bow)
↳ Levels 1–5: 15, 30, 45, 60, 75
↳ Levels 6–20: 100, 118, 136, 154, 172, 190, 208, 226, 244, 262, 280, 298, 316, 334, 352
↳ Scaling: +18 XP per level after Level 6
• Diamond Tier
↳ Levels 1–5: 40, 80, 120, 160, 200
↳ Levels 6–20: 120, 140, 160, 180, 200, 220, 240, 260, 280, 300, 320, 340, 360, 380, 400
↳ Scaling: +20 XP per level after Level 6 (Note: Level 6 cost dips lower than Level 5)
──────── ⋆⋅☆⋅⋆ ────────
Material Costs
Note: Base material = Planks (Wood), Cobblestone (Stone), Copper Ingot (Copper), Gold Ingot (Gold), Iron Ingot (Iron), or Diamond (Diamond).
• Levels 1–5:
↳ Lapis Lazuli: 4, 8, 12, 16, 20
↳ Base Material: 2, 3, 4, 5, 6
• Lapis Blocks:
↳ Levels 6–15: 9, 16, 25, 36, 49, 64, 81, 100, 121, 144
↳ Levels 16–20: 25, 36, 49, 64, 81
• Quartz:
↳ Levels 6–15: 36, 49, 64, 81, 100, 121, 144, 169, 196, 225
↳ Levels 16–20: 256, 289, 324, 361, 400
• Emeralds:
↳ Levels 16–20 Only: 144, 169, 196, 225, 256
──────── ⋆⋅☆⋅⋆ ────────
Experience Costs by Tool Tier
A breakdown of the XP required to upgrade your tools at each level.
• Wood Tier (Includes Flint & Steel, Fishing Rod)
↳ Levels 1–5: 3, 6, 9, 12, 15
↳ Levels 6–20: 70, 84, 98, 112, 126, 140, 154, 168, 182, 196, 210, 224, 238, 252, 266
↳ Scaling: +14 XP per level after Level 6
• Stone / Copper / Gold Tiers (All identical)
↳ Levels 1–5: 5, 10, 15, 20, 25
↳ Levels 6–20: 75, 90, 105, 120, 135, 150, 165, 180, 195, 210, 225, 240, 255, 270, 285
↳ Scaling: +15 XP per level after Level 6
• Iron Tier (Includes Shears, Shield, Bow)
↳ Levels 1–5: 15, 30, 45, 60, 75
↳ Levels 6–20: 100, 118, 136, 154, 172, 190, 208, 226, 244, 262, 280, 298, 316, 334, 352
↳ Scaling: +18 XP per level after Level 6
• Diamond Tier
↳ Levels 1–5: 40, 80, 120, 160, 200
↳ Levels 6–20: 120, 140, 160, 180, 200, 220, 240, 260, 280, 300, 320, 340, 360, 380, 400
↳ Scaling: +20 XP per level after Level 6 (Note: Level 6 cost dips lower than Level 5)
──────── ⋆⋅☆⋅⋆ ────────
Material Costs
Note: Base material = Planks (Wood), Cobblestone (Stone), Copper Ingot (Copper), Gold Ingot (Gold), Iron Ingot (Iron), or Diamond (Diamond).
• Levels 1–5:
↳ Lapis Lazuli: 4, 8, 12, 16, 20
↳ Base Material: 2, 3, 4, 5, 6
• Lapis Blocks:
↳ Levels 6–15: 9, 16, 25, 36, 49, 64, 81, 100, 121, 144
↳ Levels 16–20: 25, 36, 49, 64, 81
• Quartz:
↳ Levels 6–15: 36, 49, 64, 81, 100, 121, 144, 169, 196, 225
↳ Levels 16–20: 256, 289, 324, 361, 400
• Emeralds:
↳ Levels 16–20 Only: 144, 169, 196, 225, 256
──────── ⋆⋅☆⋅⋆ ────────
Note: Protection maxes at 20 for every armour piece.
Note: On Bedrock, Blast & Fire Protection are currently bugged.
──────── ⋆⋅☆⋅⋆ ────────
Helmet
Enchantments:
Protection IV
Fire Protection VII
Unbreaking VII
Aqua Affinity
Respiration I
Augments:
Leech / Lightweight hat
Assassin 2
Healthy 2
──────── ⋆⋅☆⋅⋆ ────────
Chestplate
Enchantments:
Protection VI
Blast Protection VII
Unbreaking VII
Augments:
Leech
Assassin 2
Absolute Unit
──────── ⋆⋅☆⋅⋆ ────────
Leggings
Enchantments:
Protection X
Swift Sneak III
Unbreaking VII
Augments:
Leech
Assassin 2
Medic
──────── ⋆⋅☆⋅⋆ ────────
Boots
Enchantments:
Depth Strider III
Soul Speed III
Unbreaking XIV
Augments:
Leech
Assassin 2
Self Repair
──────── ⋆⋅☆⋅⋆ ────────
Note: On Bedrock, Blast & Fire Protection are currently bugged.
──────── ⋆⋅☆⋅⋆ ────────
Helmet
Enchantments:
Protection IV
Fire Protection VII
Unbreaking VII
Aqua Affinity
Respiration I
Augments:
Leech / Lightweight hat
Assassin 2
Healthy 2
──────── ⋆⋅☆⋅⋆ ────────
Chestplate
Enchantments:
Protection VI
Blast Protection VII
Unbreaking VII
Augments:
Leech
Assassin 2
Absolute Unit
──────── ⋆⋅☆⋅⋆ ────────
Leggings
Enchantments:
Protection X
Swift Sneak III
Unbreaking VII
Augments:
Leech
Assassin 2
Medic
──────── ⋆⋅☆⋅⋆ ────────
Boots
Enchantments:
Depth Strider III
Soul Speed III
Unbreaking XIV
Augments:
Leech
Assassin 2
Self Repair
──────── ⋆⋅☆⋅⋆ ────────
──────── ⋆⋅☆⋅⋆ ────────
Pickaxe (General Mining / Ores)
Enchantments:
Efficiency 6 (Bedrock) / Efficiency 8 (Java)
Fortune 11
Unbreaking 3
(Fortune 14 if you prefer that instead, then don't put on Unbreaking 3)
Augments:
Shatter III
Smelty-Pick II / Magnet
Lucky Pick
──────── ⋆⋅☆⋅⋆ ────────
Pickaxe (Ice / Silk Touch Blocks)
Enchantments:
Silk Touch
Efficiency 4 (for ice), Efficiency 6 otherwise
Unbreaking 15
Augments:
Haste Mining
──────── ⋆⋅☆⋅⋆ ────────
Pickaxe (For Dungeons)
Enchantments:
Efficiency 10 (Spawner does not get insta-mined)
Unbreaking 10
Augments:
Explosive Spawners
Spawner Protection
──────── ⋆⋅☆⋅⋆ ────────
Axe (General Tree Chopping)
Enchantments:
Efficiency 6 (Bedrock) / Efficiency 8 (Java)
Fortune 11
Unbreaking 3
(Fortune 14 if you prefer that instead, then don't put on Unbreaking 3)
Augments:
Total Collapse 3
Magnet
Leaf Me Alone / Top Down
──────── ⋆⋅☆⋅⋆ ────────
Shovel
Enchantments:
Efficiency 5
Unbreaking 15
Augments:
Fertile Soil 3
Digging for loot
(Shovels are often only used for Player Trait boosts, hence the lack of need for a third augment)
──────── ⋆⋅☆⋅⋆ ────────
Hoe
Enchantments:
Fortune 20
Augments:
Breaking AOE 2
More Drops
Auto Replant
──────── ⋆⋅☆⋅⋆ ────────
Pickaxe (General Mining / Ores)
Enchantments:
Efficiency 6 (Bedrock) / Efficiency 8 (Java)
Fortune 11
Unbreaking 3
(Fortune 14 if you prefer that instead, then don't put on Unbreaking 3)
Augments:
Shatter III
Smelty-Pick II / Magnet
Lucky Pick
──────── ⋆⋅☆⋅⋆ ────────
Pickaxe (Ice / Silk Touch Blocks)
Enchantments:
Silk Touch
Efficiency 4 (for ice), Efficiency 6 otherwise
Unbreaking 15
Augments:
Haste Mining
──────── ⋆⋅☆⋅⋆ ────────
Pickaxe (For Dungeons)
Enchantments:
Efficiency 10 (Spawner does not get insta-mined)
Unbreaking 10
Augments:
Explosive Spawners
Spawner Protection
──────── ⋆⋅☆⋅⋆ ────────
Axe (General Tree Chopping)
Enchantments:
Efficiency 6 (Bedrock) / Efficiency 8 (Java)
Fortune 11
Unbreaking 3
(Fortune 14 if you prefer that instead, then don't put on Unbreaking 3)
Augments:
Total Collapse 3
Magnet
Leaf Me Alone / Top Down
──────── ⋆⋅☆⋅⋆ ────────
Shovel
Enchantments:
Efficiency 5
Unbreaking 15
Augments:
Fertile Soil 3
Digging for loot
(Shovels are often only used for Player Trait boosts, hence the lack of need for a third augment)
──────── ⋆⋅☆⋅⋆ ────────
Hoe
Enchantments:
Fortune 20
Augments:
Breaking AOE 2
More Drops
Auto Replant
──────── ⋆⋅☆⋅⋆ ────────
──────── ⋆⋅☆⋅⋆ ────────
Sword (For Undead Mobs)
Enchantments:
Smite 20
Augments:
Multi-Hit
Slayer of the Undead
Gambler 2 / Lightning Bolt
──────── ⋆⋅☆⋅⋆ ────────
Sword (For Arthropod Mobs)
Enchantments:
Bane of Arthropods 20
Augments:
Multi-Hit
Arachnophobe
Gambler 2 / Lightning Bolt
──────── ⋆⋅☆⋅⋆ ────────
Sword (For Other Mobs)
Enchantments:
Sharpness 20
Augments:
Multi-Hit
Gambler 2
Lightning Bolt
──────── ⋆⋅☆⋅⋆ ────────
Sword (For Looting Base Farms)
Enchantments:
Looting 20
Augments:
Multi-Hit
──────── ⋆⋅☆⋅⋆ ────────
Spear
Enchantments:
Lunge 3
Unbreaking 17
Note: A Wooden Spear is advised as it has a slightly faster cooldown than Diamond, allowing you to lunge more frequently.
Warning: Using the Lunge enchantment consumes hunger, so make sure to keep your hunger bar topped up.
──────── ⋆⋅☆⋅⋆ ────────
Bow
Enchantments:
Infinity
Power 10
Unbreaking 9
Augments:
Soon To Be Added
──────── ⋆⋅☆⋅⋆ ────────
Sword (For Undead Mobs)
Enchantments:
Smite 20
Augments:
Multi-Hit
Slayer of the Undead
Gambler 2 / Lightning Bolt
──────── ⋆⋅☆⋅⋆ ────────
Sword (For Arthropod Mobs)
Enchantments:
Bane of Arthropods 20
Augments:
Multi-Hit
Arachnophobe
Gambler 2 / Lightning Bolt
──────── ⋆⋅☆⋅⋆ ────────
Sword (For Other Mobs)
Enchantments:
Sharpness 20
Augments:
Multi-Hit
Gambler 2
Lightning Bolt
──────── ⋆⋅☆⋅⋆ ────────
Sword (For Looting Base Farms)
Enchantments:
Looting 20
Augments:
Multi-Hit
──────── ⋆⋅☆⋅⋆ ────────
Spear
Enchantments:
Lunge 3
Unbreaking 17
Note: A Wooden Spear is advised as it has a slightly faster cooldown than Diamond, allowing you to lunge more frequently.
Warning: Using the Lunge enchantment consumes hunger, so make sure to keep your hunger bar topped up.
──────── ⋆⋅☆⋅⋆ ────────
Bow
Enchantments:
Infinity
Power 10
Unbreaking 9
Augments:
Soon To Be Added
──────── ⋆⋅☆⋅⋆ ────────
Experience
Experience is an important part of progression in CubeCraft Skyblock. Whether you're levelling up your unlocking new abilities, improving your Traits, or preparing for tougher Dungeons, gaining experience efficiently can make a huge difference.
Grinding experience isn't just about farming nonstop, it's about knowing the best ways to gain XP and which methods are actually worth your time. Using inefficient methods can leave you spending hours for very little progress.
This guide breaks down the best ways to gain Experience at each stage of the game, the most efficient methods to use, and how to maximize your XP gains.
When starting your adventure in CubeCraft Skyblock, you should focus on mining ores such as Lapis Lazuli and Coal to gain XP. Dungeons are another great source of experience, particularly Cobblestone Mine and Plains. For a more efficient method, check the Dungeon Guide video, or during Wave 3 of Plains, when you need to escort the villagers, head into a corner and wait for the Zombies to attack. You can safely farm the Zombies for XP, allowing you to reach around Level 50 in Plains Level 3 fairly quickly.
Once you reach the Savannah Island, you’ll receive four Skeleton Spawners at levels 18, 20, 24, and 28. Focus on upgrading these to around Level 35, depending on your available boosts, and place them into a dropper system similar to the one shown below. This setup will help you efficiently farm Skeletons and maximize your XP gains.
 www.shulkr.com
Experience Farm | Phases 2 & 3 - Minecraft Schematic - Shulkr
An efficient mob farm design. Mobs spawn in a dark chamber, then get funneled down through the farm to a central killing point where you finish them off for experience. Collect their drops from the chests at the bottom. 22×70×21, 3,158 blocks. Free Minecraft schematic download with a 3D preview...
www.shulkr.com
Once you reach the Piglin Colony, you’ll receive four Pigman Spawners at levels 20, 24, 25, and 25. Add these to your existing Skeleton farm alongside your Skeleton Spawners, then focus on upgrading them towards the optimal Level 75. This will significantly improve the farm’s efficiency and help maximize your XP gains.
This is where the end-game XP grind begins. You’ll gain four Wither Skeleton Spawners at Levels 39, 40, 42, and 45. Upgrade these to around Level 107, or follow the recommended levels in the Spawner Upgrade Sheet based on your setup and available boosts.
Once upgraded, build the end-game farm design shown below. You can also move your existing Skeleton and Pigman Spawners from your previous farms into this setup, allowing you to combine everything into one powerful XP farm.
www.shulkr.com
Once upgraded, build the end-game farm design shown below. You can also move your existing Skeleton and Pigman Spawners from your previous farms into this setup, allowing you to combine everything into one powerful XP farm.
Coins and Experience Farm - Phase 5 | End-Game - Minecraft Schematic - Shulkr
A compact vertical mob farm that uses bubble columns to lift spawned mobs into a central kill chamber, letting you finish them off by hand with a Looting sword for massively boosted item drops. 13×29×13, 4,537 blocks. Free Minecraft schematic download with a 3D preview on Shulkr.
www.shulkr.com
For XP, Blazes are completely optional. A fully maxed-out Wither Skeleton farm is more than enough for efficient experience farming. However, if you want to push your XP gains even further, you can build a Level 127 Blaze Spawner farm using the same farm design shown in the Wither Skeleton section.
Boosts vary depending on your rank. The Skyblock Pass, Obsidian Rank, and Diamond Rank all provide a 10% XP boost to the owner and a 3% boost to island members.
Island Management
How can I invite a friend to my Skyblock island?
Inviting a friend to your Skyblock island is easy! To do this, you will first need to head over to your Island's profile settings, accessible through the cog/gear in your hotbar. Then, select your profile. Your active profile should
How can I delete my Skyblock island?
This method will only work on CoOp profiles. It is currently not possible to delete Solo island profiles (Profile 1). If you wish to leave or remove your island, you can do this through your Skyblock Menu. Select "Profiles" and select the
Island Information
When you first join Skyblock, you spawn on the Oak Forest Island, a modest 80x80 block plot. Yet that's only the very beginning of your journey!
As you progress, you'll unlock a total of 9 overworld islands and 4 nether islands. Every new island expands your available space by another 80x80 block plot, eventually capping out at a massive 240x240 blocks in the overworld and 160x160 blocks in the nether. Each island also introduces new generators, spawners, and items to discover, all listed in the spoiler below.
Unlocking each island isn't automatic either, you'll need to complete specific quests tied to your current island before the next one opens up. If you want to see exactly what's required check out the Quest List for a complete breakdown.
──────── ⋆⋅☆⋅⋆ ────────
Overworld
Oak Forest
No Generators or Spawners
Plains
20 Coal Generators
L1 | Cow Spawner
Snowy Taiga
5 Coal Generators
14 Lapis Generators
L3, 5 | Chicken Spawner
Jungle
5 Coal Generators
3 Lapis Generators
7 Copper Generators
L8 | Ocelot Spawner
L3, 4, 6, 8 | Spider Spawner
Desert
4 Coal Generators
4 Lapis Generators
2 Copper Generators
L10 | Spider Spawner
L10, 12, 14 | Zombie Spawner
Birch Forest
8 Coal Generators
2 Lapis Generators
3 Copper Generators
14 Iron Generators
L18 | Zombie Spawner
L10, 12, 16 | Cave Spider Spawner
Savannah
22 Coal Generators
6 Lapis Generators
7 Iron Generators
16 Gold Generators
L20 | Spider Spawner
L20 | Zombie Spawner
L14 | Cave Spider Spawner
L18, 20, 24, 28 | Skeleton Spawner
L20 | Pig Spawner
Extreme Hills
37 Coal Generators
14 Lapis Generators
4 Copper Generators
7 Iron Generators
6 Gold Generators
12 Emerald Generators
L24 | Zombie Spawner
L25, 26 | Skeleton Spawner
L18, 26, 28 | Creeper Spawner
L28, 30 32 | Sheep Spawner
Swampland
37 Coal Generators
18 Lapis Generators
12 Iron Generators
11 Gold Generators
6 Emerald Generators
11 Diamond Generators
L20, 38 | Spider Spawner
L38, 40 | Zombie Spawner
L30 | Cave Spider Spawner
L28, 35 | Skeleton Spawner
L40 | Creeper Spawner
L30, 2x34, 40 | Slime Spawner
L28, 30, 32, 36 | Witch Spawner
──────── ⋆⋅☆⋅⋆ ────────
Nether
Pigman Colony
21 Quartz Generators
L20, 24, 2x25 | Pigman Spawner
Magma Graveyard
29 Quartz Generators
L32, 30 | Pigman Spawner
L26, 27, 28 | Magma Cube Spawner
Nether Fortress
38 Quartz Generators
L40 | Pigman Spawner
L40 | Magma Cube Spawner
L40 | Blaze Spawner
L39, 40, 42, 45 | Wither Skeleton Spawner
Blaze Spawner
44 Quartz Generators
L50 | Pigman Spawner
L50 | Magma Cube Spawner
L40, 45, 2x48 | Blaze Spawner
L56, 75 | Wither Skeleton Spawner
──────── ⋆⋅☆⋅⋆ ────────
Overworld
Oak Forest
No Generators or Spawners
Plains
20 Coal Generators
L1 | Cow Spawner
Snowy Taiga
5 Coal Generators
14 Lapis Generators
L3, 5 | Chicken Spawner
Jungle
5 Coal Generators
3 Lapis Generators
7 Copper Generators
L8 | Ocelot Spawner
L3, 4, 6, 8 | Spider Spawner
Desert
4 Coal Generators
4 Lapis Generators
2 Copper Generators
L10 | Spider Spawner
L10, 12, 14 | Zombie Spawner
Birch Forest
8 Coal Generators
2 Lapis Generators
3 Copper Generators
14 Iron Generators
L18 | Zombie Spawner
L10, 12, 16 | Cave Spider Spawner
Savannah
22 Coal Generators
6 Lapis Generators
7 Iron Generators
16 Gold Generators
L20 | Spider Spawner
L20 | Zombie Spawner
L14 | Cave Spider Spawner
L18, 20, 24, 28 | Skeleton Spawner
L20 | Pig Spawner
Extreme Hills
37 Coal Generators
14 Lapis Generators
4 Copper Generators
7 Iron Generators
6 Gold Generators
12 Emerald Generators
L24 | Zombie Spawner
L25, 26 | Skeleton Spawner
L18, 26, 28 | Creeper Spawner
L28, 30 32 | Sheep Spawner
Swampland
37 Coal Generators
18 Lapis Generators
12 Iron Generators
11 Gold Generators
6 Emerald Generators
11 Diamond Generators
L20, 38 | Spider Spawner
L38, 40 | Zombie Spawner
L30 | Cave Spider Spawner
L28, 35 | Skeleton Spawner
L40 | Creeper Spawner
L30, 2x34, 40 | Slime Spawner
L28, 30, 32, 36 | Witch Spawner
──────── ⋆⋅☆⋅⋆ ────────
Nether
Pigman Colony
21 Quartz Generators
L20, 24, 2x25 | Pigman Spawner
Magma Graveyard
29 Quartz Generators
L32, 30 | Pigman Spawner
L26, 27, 28 | Magma Cube Spawner
Nether Fortress
38 Quartz Generators
L40 | Pigman Spawner
L40 | Magma Cube Spawner
L40 | Blaze Spawner
L39, 40, 42, 45 | Wither Skeleton Spawner
Blaze Spawner
44 Quartz Generators
L50 | Pigman Spawner
L50 | Magma Cube Spawner
L40, 45, 2x48 | Blaze Spawner
L56, 75 | Wither Skeleton Spawner
──────── ⋆⋅☆⋅⋆ ────────
Mechanics
Skyblock runs a little differently from vanilla Minecraft while still keeping that familiar vanilla feel. Whether you’re looking into Fortune, Looting, armour enchantments, spawner mechanics, or some of the more detailed systems behind the game, this mechanics guide has you covered, including the formulas.
Fortune
Works on any generator, crops and tree, regardless of tool, as long as the resource can normally be harvested with that tool. Example: a Fortune pickaxe works on crops, but a Fortune axe doesn't work on coal ore, since coal wouldn't drop from an axe normally.
Fortune gives a 10% chance per level to drop 1 extra item (not double the drop). So Fortune 10 = guaranteed 1 extra drop, and Fortune 15 = guaranteed 1 extra drop + 50% chance at a 2nd extra drop.
Looting
Works only on mobs, giving a 25% chance per level for ONE extra drop. Looting 4 = guaranteed 1 extra drop.
(Every 4 levels of looting = guaranteed 1 extra drop)
Armour Enchants
All protection enchants function the same as vanilla. However, since normal Protection can be maxed out, Projectile Protection and Feather Falling become useless. Fire Protection and Blast Protection are only useful for their side effects such as reduced burn time and reduced explosion knockback.
It doesn't matter how you distribute protection levels across your armor pieces. Protection 20 on one piece with none on the rest gives you the same max protection as spreading it evenly. Protection is capped at 80%, so having more than 20 total levels spread across your armor gives no additional benefit.
Works on any generator, crops and tree, regardless of tool, as long as the resource can normally be harvested with that tool. Example: a Fortune pickaxe works on crops, but a Fortune axe doesn't work on coal ore, since coal wouldn't drop from an axe normally.
Fortune gives a 10% chance per level to drop 1 extra item (not double the drop). So Fortune 10 = guaranteed 1 extra drop, and Fortune 15 = guaranteed 1 extra drop + 50% chance at a 2nd extra drop.
Looting
Works only on mobs, giving a 25% chance per level for ONE extra drop. Looting 4 = guaranteed 1 extra drop.
(Every 4 levels of looting = guaranteed 1 extra drop)
Armour Enchants
All protection enchants function the same as vanilla. However, since normal Protection can be maxed out, Projectile Protection and Feather Falling become useless. Fire Protection and Blast Protection are only useful for their side effects such as reduced burn time and reduced explosion knockback.
It doesn't matter how you distribute protection levels across your armor pieces. Protection 20 on one piece with none on the rest gives you the same max protection as spreading it evenly. Protection is capped at 80%, so having more than 20 total levels spread across your armor gives no additional benefit.
Spawn area
Mobs can spawn in a 9×3×9 area centered on the spawner; that is, within a 4 block horizontal and 1 block vertical range.
Spawn cycles
A spawner's cooldown can be reset to 12, 15, 18, or 21 seconds (equally probable). Every 3 seconds, all spawner cooldowns are reduced by 3 seconds, and every spawner with a cooldown 0 or less activates. This interval is commonly referred to as the spawn cycle.
Spawner activation
Here goes the sequence:
If the dimension mob cap is reached, sequence is aborted.
The cooldown is reset.
Сhecks for at least one player within a horizontal radius of 32 blocks (vertical distance is ignored). If none is found, sequence is aborted.
Randomly selects whether to spawn 1 or 2 mobs (equally probable). For each mob, up to 15 spawn attempts are made until one succeeds.
Mob spawn attempt
First, random integer coordinates are selected within the spawn area.
Then, the block below the selected coordinates is checked.
If it is air, the spawn attempt fails. In other words, mob can spawn above any block that is not air.
A random floating-point value from 0 to 1 is added to each X and Z coordinates. The resulting position is the mob's spawn point.
If there is no sufficient space for the mob's hitbox, the spawn attempt fails. Otherwise, if no limits prevent spawning, the spawn attempt succeeds.
Mob limits
There are three limits to consider.
Dimension mob cap. There is a limit of 250 mobs alive simultaneously within the same dimension. Any mob spawn attempt fails if this number is reached. All mobs are counted, including those outside any player's render distance.
Spawner mob cap. Each spawner can have up to 3 of its spawned mobs alive at a time. Any spawn attempt by that spawner fails once this limit is reached.
Maximum hostile mob distance. Any hostile mob immediately despawns if there is no player within a spherical radius of 128 blocks.
Mobs can spawn in a 9×3×9 area centered on the spawner; that is, within a 4 block horizontal and 1 block vertical range.
Spawn cycles
A spawner's cooldown can be reset to 12, 15, 18, or 21 seconds (equally probable). Every 3 seconds, all spawner cooldowns are reduced by 3 seconds, and every spawner with a cooldown 0 or less activates. This interval is commonly referred to as the spawn cycle.
Spawner activation
Here goes the sequence:
If the dimension mob cap is reached, sequence is aborted.
The cooldown is reset.
Сhecks for at least one player within a horizontal radius of 32 blocks (vertical distance is ignored). If none is found, sequence is aborted.
Randomly selects whether to spawn 1 or 2 mobs (equally probable). For each mob, up to 15 spawn attempts are made until one succeeds.
Mob spawn attempt
First, random integer coordinates are selected within the spawn area.
Then, the block below the selected coordinates is checked.
If it is air, the spawn attempt fails. In other words, mob can spawn above any block that is not air.
A random floating-point value from 0 to 1 is added to each X and Z coordinates. The resulting position is the mob's spawn point.
If there is no sufficient space for the mob's hitbox, the spawn attempt fails. Otherwise, if no limits prevent spawning, the spawn attempt succeeds.
Mob limits
There are three limits to consider.
Dimension mob cap. There is a limit of 250 mobs alive simultaneously within the same dimension. Any mob spawn attempt fails if this number is reached. All mobs are counted, including those outside any player's render distance.
Spawner mob cap. Each spawner can have up to 3 of its spawned mobs alive at a time. Any spawn attempt by that spawner fails once this limit is reached.
Maximum hostile mob distance. Any hostile mob immediately despawns if there is no player within a spherical radius of 128 blocks.
Unbreaking
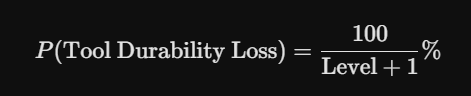

Applies to Crit Chance, Projectile Crit Chance, Dodge Chance, Multi-shot Chance

Resistance & Dodge Resistance

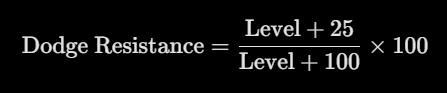
Applies to Crit Chance, Projectile Crit Chance, Dodge Chance, Multi-shot Chance
Resistance & Dodge Resistance
Player Traits
Traits define your character’s stats and are split into two categories: Player Traits, which affect personal stats such as max health, strength, and critical chance, and Profile Traits, which are shared across your entire profile. Traits can be upgraded in several ways, including levelling up your player, finding Shrines, and collecting Discoverables. Make sure to keep your Traits upgraded, as they can make a significant difference to your overall progression and combat ability.
Player Trait Upgrade Methods
Here's a list of all the ways to upgrade player traits in Skyblock. Let me know if there are any mistakes or something I forgot to add. Anything with a ⭐ can be stacked by obtaining them on multiple tools/armor.
Quests
Ever wanted to see all the quests in Skyblock, including hidden quests and Hub quests? This guide contains a complete list of quests, including the ones that are easy to miss, so you can keep track of everything and make sure you don’t miss a single one.


Shrines
Shrines let you convert excess resources into permanent profile-wide Trait upgrades. Every player eventually ends up with more of certain resources than they'll ever use. Shrines give those a purpose.
Each lobby has a shrine for each item that is unlocked on your personal island, be it a generator, crop, tree or mob.
Each Shrine location by coordinates, to find your coordinates use "/wai" in the chat.
Overworld
Oak Forest Hub
Cobblestone Shrine - (-65, 40, 5220)
Oak Log Shrine - (-238, 53, 4958)
Beetroot Shrine - (74, 44, 5053)
Plains Hub
Coal Shrine - (2006, 64, 5205)
Pumpkin Shrine - (2139, 74, 5092)
Potato Shrine - (2083, 81, 4816)
Cow Shrine - (1880, 68, 4945)
Snowy Taiga Hub
Lapis Lazuli Shrine - (-126, 68, 6859)
Spruce Shrine - (-5, 91, 7284)
Chicken Shrine - (126, 75, 6846)
Wheat Shrine - (-196, 76, 7126)
Jungle Hub
Cocoa Beans Shrine - (157, 95, 9069)
Spider Shrine - (63, 70, 8900)
Cod Shrine - (-152, 78, 8826)
Copper Shrine - (-253, 79, 9086)
Jungle Log Shrine - (-180, 92, 9273)
Desert Hub
Cactus Shrine - (-13, 81, 10814)
Zombie Shrine - (-229, 91, 11125)
Nether
Piglin Colony Hub
Glowstone Shrine - (92, 27, 5132)
Quartz Shrine - (-148, 15, 5203)
Piglin Shrine - (-109, 99, 4999)
Overworld
Oak Forest Hub
Cobblestone Shrine - (-65, 40, 5220)
Oak Log Shrine - (-238, 53, 4958)
Beetroot Shrine - (74, 44, 5053)
Plains Hub
Coal Shrine - (2006, 64, 5205)
Pumpkin Shrine - (2139, 74, 5092)
Potato Shrine - (2083, 81, 4816)
Cow Shrine - (1880, 68, 4945)
Snowy Taiga Hub
Lapis Lazuli Shrine - (-126, 68, 6859)
Spruce Shrine - (-5, 91, 7284)
Chicken Shrine - (126, 75, 6846)
Wheat Shrine - (-196, 76, 7126)
Jungle Hub
Cocoa Beans Shrine - (157, 95, 9069)
Spider Shrine - (63, 70, 8900)
Cod Shrine - (-152, 78, 8826)
Copper Shrine - (-253, 79, 9086)
Jungle Log Shrine - (-180, 92, 9273)
Desert Hub
Cactus Shrine - (-13, 81, 10814)
Zombie Shrine - (-229, 91, 11125)
Nether
Piglin Colony Hub
Glowstone Shrine - (92, 27, 5132)
Quartz Shrine - (-148, 15, 5203)
Piglin Shrine - (-109, 99, 4999)
Warpers
Warpers are special crystals found throughout the Hubs that allow you to quickly teleport to various locations, including Shrines, special areas, and Dungeons. They make travelling around Skyblock much easier, especially when you need to reach a specific location quickly.
Each Warper Locations by Hubs - Warper Locations
Recommended Mod & Settings
Setting up your video settings and client properly can make a real difference in performance and how quickly you can see and react to things. Here are some recommended settings to reduce lag and clean up your UI, plus a few modification clients that add useful extras like coordinate HUDs and entity rendering toggles.
None of it's required, but it can give you a noticeable edge to improve your experience.
──────── ⋆⋅☆⋅⋆ ────────
Bedrock Edition
Clients like Flarial can help improve your experience (Environment Changer Module), and it works on both PC and Mobile.
Another client, Oderso, is also available but is PC only. No modification clients currently work on Console, so this section only applies if you're playing on PC or Mobile.
──────── ⋆⋅☆⋅⋆ ────────
Java Edition
Popular clients include Lunar Client and LabyMod.
──────── ⋆⋅☆⋅⋆ ────────
These clients let you customize a lot of extra features that aren't in the normal game, for example turning on a coordinates HUD so it's always visible, which helps with things like finding your way back or reporting locations. You can also toggle entity rendering off, so other players or mobs don't render on your screen, which can help reduce lag.
There's a bunch of other toggles and HUD options in these clients too, so it's worth exploring the settings and turning on whatever helps your gameplay the most.
──────── ⋆⋅☆⋅⋆ ────────
Bedrock Edition
Clients like Flarial can help improve your experience (Environment Changer Module), and it works on both PC and Mobile.
Another client, Oderso, is also available but is PC only. No modification clients currently work on Console, so this section only applies if you're playing on PC or Mobile.
──────── ⋆⋅☆⋅⋆ ────────
Java Edition
Popular clients include Lunar Client and LabyMod.
──────── ⋆⋅☆⋅⋆ ────────
These clients let you customize a lot of extra features that aren't in the normal game, for example turning on a coordinates HUD so it's always visible, which helps with things like finding your way back or reporting locations. You can also toggle entity rendering off, so other players or mobs don't render on your screen, which can help reduce lag.
There's a bunch of other toggles and HUD options in these clients too, so it's worth exploring the settings and turning on whatever helps your gameplay the most.
──────── ⋆⋅☆⋅⋆ ────────
──────── ⋆⋅☆⋅⋆ ────────
Bedrock Editions
Video Settings
Render Distance: CubeCraft only supports up to around 12 (possibly 16) chunks. It's not worth setting it any higher, since the server won't render past its own limit, so you'll just be pushing your device harder for no benefit.
Brightness: 100, you want full visibility at all times.
Screen Animations: Off, for a snappier, faster UI.
View Bobbing and Camera Shake: Off.
GUI Scale Modifier: Set to around 75% (roughly -1 varies per device). This lets you see more of the screen without the UI taking up too much space.
All Other Settings
Down to personal preference and what your device can handle.
──────── ⋆⋅☆⋅⋆ ────────
Java Edition
Video Settings
(Where this is located depends on your Client, but typically in the settings then video)
Render Distance: CubeCraft only supports up to around 12 (possibly 16) chunks. It's not worth setting it any higher, since the server won't render past its own limit, so you'll just be pushing your device harder for no benefit.
All Other Settings
Down to personal preference and what your PC can handle.
──────── ⋆⋅☆⋅⋆ ────────
Bedrock Editions
Video Settings
Render Distance: CubeCraft only supports up to around 12 (possibly 16) chunks. It's not worth setting it any higher, since the server won't render past its own limit, so you'll just be pushing your device harder for no benefit.
Brightness: 100, you want full visibility at all times.
Screen Animations: Off, for a snappier, faster UI.
View Bobbing and Camera Shake: Off.
GUI Scale Modifier: Set to around 75% (roughly -1 varies per device). This lets you see more of the screen without the UI taking up too much space.
All Other Settings
Down to personal preference and what your device can handle.
──────── ⋆⋅☆⋅⋆ ────────
Java Edition
Video Settings
(Where this is located depends on your Client, but typically in the settings then video)
Render Distance: CubeCraft only supports up to around 12 (possibly 16) chunks. It's not worth setting it any higher, since the server won't render past its own limit, so you'll just be pushing your device harder for no benefit.
All Other Settings
Down to personal preference and what your PC can handle.
──────── ⋆⋅☆⋅⋆ ────────
I hope this thread has helped you on your CubeCraft Skyblock journey!
If there's anything you need that isn't covered here, feel free to ask in the Skyblock Channel on the CubeCraft Discord or you can start a conversation with me!
You can also join the Skyblock Community Discord for more Skyblock discussion, help and a place to connect with other players.
Special thanks to those who helped in the making of the Guides Hub:
@samnotsam - Augments List
@Xavi | Goofy - Quest List
@_dnn - Discoverables
@CxbeCraft - Tutorial Videos - Tool & Weapon Enchants & Augments
@DespairScent - Spawner Mechanics
@BesottedPotato - Player Trait Upgrade Methods & Formulas
Last edited:


